If you’re looking for the perfect fall dessert that’s easy to make, incredibly moist, and packed with cozy flavors, you’re going to love this Caramel Apple Poke Cake Recipe.
This recipe combines three of my favorite elements: my Apple Cider Donut Bundt Cake batter as the base, my rich and silky homemade caramel whipped cream, and a sweet-tart apple pie filling from my French Apple Pie Cake.
This cake is inspired by my Pumpkin Poke Cake, but with all the best flavors of fall apples, warm spices, and caramel.
It’s perfect for Thanksgiving, a fall birthday, or just a cozy weekend bake. Plus, this recipe is a make-ahead dessert that tastes even better the next day!

Why You’ll Love This Caramel Apple Poke Cake
Perfect for fall: Apple cider, warm spices, and caramel make this the ultimate autumn dessert.
Moist and flavorful: Poking the cake allows the apple filling to seep in, making every bite extra soft.
Make–ahead friendly: The flavors develop beautifully overnight, making this an easy dessert for gatherings.
Crowd-pleaser: A 9×13″ cake serves a crowd, making it ideal for parties, potlucks, and holidays.

What You’ll Need
Ingredients
For the Apple Cider Cake:
- 3 cups (360 g) all-purpose flour
- 2 tsp (5 g) ground cinnamon
- 1/4 tsp (1 g) nutmeg
- 1 tsp (6 g) salt
- 1 1/2 tablespoon (21 g) baking powder
- 1 1/2 cups (300 g) granulated sugar
- 1/2 cup (110 g) brown sugar, packed
- 1 cup (224 g) vegetable oil
- 3 eggs, at room temperature
- 1 cup (250 g) applesauce, room temperature
- 1 cup (248 g) apple cider juice, room temperature
- 1 teaspoon (4.2 g) vanilla extract

For the Apple Pie Filling:
- 4 large Granny Smith apples
- 3 tablespoons (42.37 g) unsalted butter
- 1 1/2 cup (330 g) light brown sugar, packed
- 1 1/2 teaspoon (3.9 g) ground cinnamon
For the Caramel:
- 1 cup (200 g) granulated sugar
- 1/2 cup (120 g) water
- 2 teaspoons (14 g) light corn syrup or honey
- 3/4 cups (180 g) heavy whipping cream
- 1 teaspoon (4.2 g) vanilla extract
- 1 teaspoon (6 g) salt
For the Caramel Whipped Cream:
- 1 cup caramel, recipe above
- 2 cups (428 g) heavy whipping cream
- 1/2 cup (75 g) powdered sugar
Equipment
- 9″ x 13″ rectangular baking pan
- Nonstick spray
- Medium-sized mixing bowl
- Electric stand or hand mixer
- Peeler or knife for peeling
- Saucepan
- Pastry brush
- Stainless steel bowl

How to Make Caramel Apple Poke Cake
Step 1: Make the Apple Cider Cake
Here’s where the magic starts! This ultra-moist base (borrowed from my beloved Apple Cider Donut Bundt) gets its incredible texture from a double dose of apple goodness: cider AND applesauce.
Preheat to 350°F and generously spray your 9×13 pan (glass works beautifully here).
Complement your kitchen with my baking tools ⤵
Whisk your dry team in a medium bowl: flour, cinnamon, nutmeg, salt, and baking powder. Set aside.
Now for the fun part – beat your sugar and oil on medium-high for 2 minutes until fluffy. Add eggs and mix for another 2 minutes (they need time to party together!). Scrape down and mix for an additional 30 seconds. Fold in applesauce and vanilla.
Here’s my mixing secret: With your mixer on low, alternate adding flour mixture and apple cider in this pattern: 1/3 flour → 1/2 cider → 1/3 flour → remaining cider → final flour. Mix just until combined – the batter will be thin (don’t panic, that’s perfect!).
Pour into your pan and bake for 35-40 minutes. You’ll know it’s ready when a toothpick comes out with just a few moist crumbs. Cool completely before the fun poke-party begins – use whatever you’ve got: fork, straw, wooden spoon handle, even chopsticks work!


Step 2: Cook the Apple Pie Filling
This filling is autumn in a pot! Quarter-inch apple chunks are key here – any bigger and they won’t nestle into those cake holes properly.
Toss your chopped Granny Smiths with butter, brown sugar, and cinnamon in a medium pot. Bring to a gentle boil over medium heat, stirring as the apples release their juices. Drop to a simmer for 5-10 minutes – watch closely! Overcook and you’ll have accidental applesauce (learned that the hard way).
Transfer to a container and chill completely. This beauty keeps for a week in the fridge, though I don’t recommend freezing.


Step 3: Make the Homemade Caramel
Trust me, homemade caramel is a game-changer here. Start by warming your cream in the microwave for about a minute – warm cream prevents shocking the caramel later.
In a saucepan, combine sugar, water, and corn syrup over medium heat. Stir just until the sugar dissolves, then hands off! Let it bubble away untouched (stirring causes crystallization – science!). If sugar crystals appear on the pan sides, brush them down with a wet pastry brush.
When it turns that gorgeous amber color, remove from the heat and slowly stream in the warm cream while stirring. The mixture will bubble dramatically – that’s normal! Add vanilla and salt, stir to combine, and let cool to room temperature. The caramel thickens as it cools and keeps for two weeks refrigerated.


Step 4: Whip the Caramel Cream
This overnight step is crucial for fluffy perfection! Mix 1 cup of your cooled caramel with heavy cream in a stainless steel bowl. Cover with plastic wrap and refrigerate overnight.
Pro tip: Cold steel = faster peaks! If you forgot to chill your bowl, pop one in the freezer for 15 minutes before whipping.
When ready to whip, add powdered sugar and beat to stiff peaks. Use immediately for best texture – this stuff waits for no one!


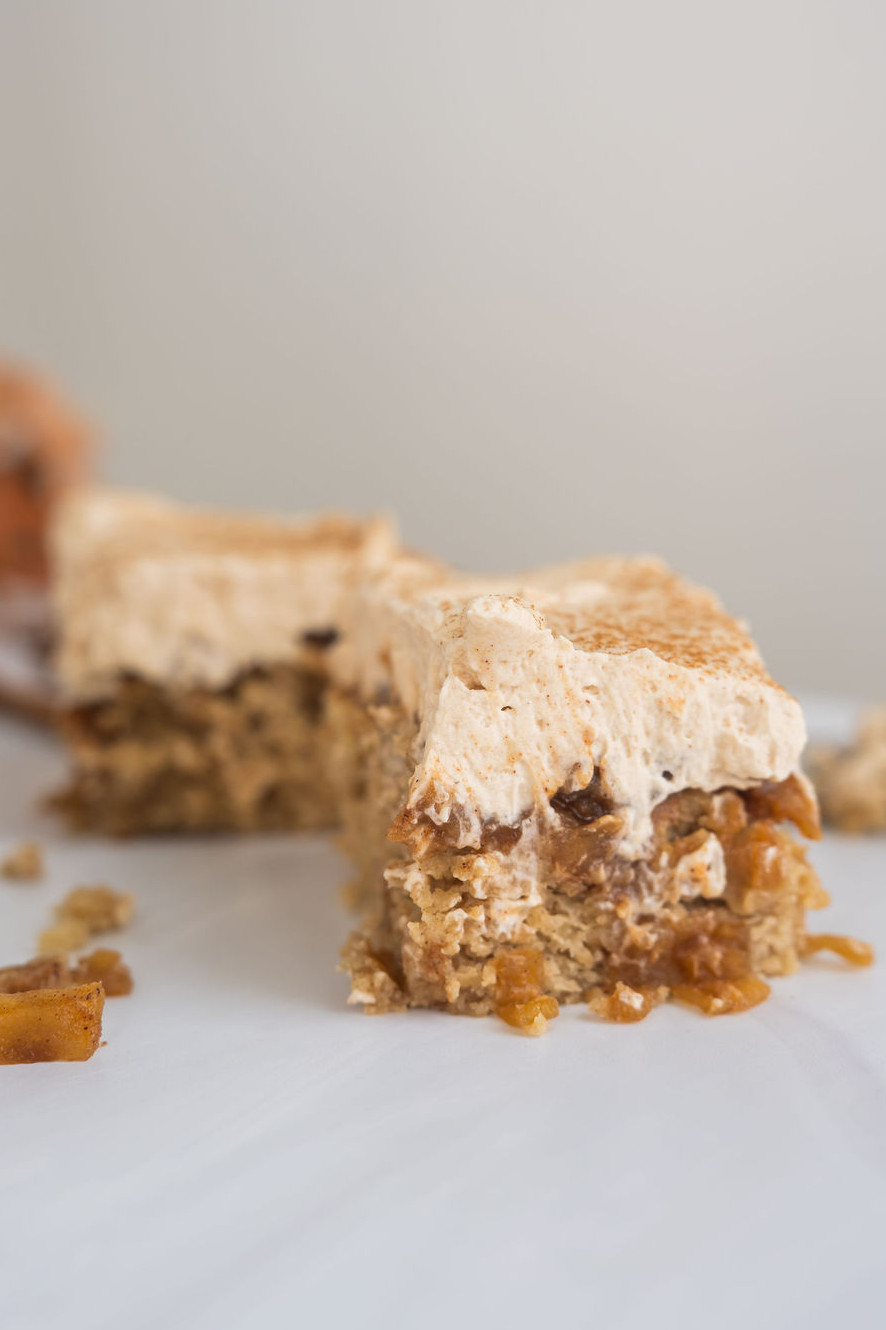
Step 5: Assemble the Cake
Time for the grand finale! Poke those holes all over your cooled cake – more holes = more flavor pockets.
When the apple filling is cooled to room temperature, spoon the apple filling over the cake, making sure those glorious juices find their way into every hole. Spread that caramel whipped cream in a thick, swoopy layer on top.
Finish with a cinnamon dusting and extra caramel drizzle if you’re feeling fancy (and when aren’t we?). Now, you should have the perfect caramel apple pie poke cake to share with everyone!


Tips for Success
- Chill your caramel cream mixture overnight for the best whipped cream texture.
- Use a glass trifle dish or a clear 9×13 dish if you want to show off the layers.
- This cake tastes even better the next day as the flavors meld together.

Serving and Storing
This cake is best served chilled. You can make it up to 24 hours ahead of time and store it in the fridge for 3-4 days.
Frequently Asked Questions
Yes! While homemade caramel is next-level delicious, a high-quality store-bought caramel sauce works too.
Absolutely! This is one of those cakes that tastes even better when left to sit overnight, making it perfect for holidays or parties.
Yes! Honeycrisp, Pink Lady, or Fuji apples also work well, though Granny Smith provides the perfect tartness.
Not at all! You can bake this as a regular 9×13 apple cider cake and simply frost it with caramel whipped cream.
Cover tightly with plastic wrap or store in an airtight container in the fridge for up to 4 days.
Yes, you can also freeze this one. Make sure it’s covered with plastic wrap to seal it. The night before you want to serve it, place it in the refrigerator.

FOR THE APPLE CIDER CAKE
- 3 cups (360 g) all-purpose flour
- 2 teaspoon (5 g) ground cinnamon
- 1/4 teaspoon (1 g) nutmeg
- 1 teaspoon (6 g) salt
- 1 1/2 tablespoon (21 g) baking powder
- 1 1/2 cups (300 g) granulated sugar
- 1/2 cup (110 g) brown sugar, packed
- 1 cup (224 g) vegetable oil
- 3 eggs, at room temperature
- 1 cup (250 g) applesauce, room temperature
- 1 cup (248 g) apple cider juice, room temperature
- 1 teaspoon (4.2 g) vanilla extract
FOR THE APPLE PIE FILLING
- 4 large Granny Smith apples
- 3 tablespoons (42.37 g) unsalted butter
- 1 1/2 cup (330 g) light brown sugar, packed
- 1 1/2 teaspoon (3.9 g) ground cinnamon
FOR THE CARAMEL
- 1 cup (200 g) granulated sugar
- 1/2 cup (120 g) water
- 2 teaspoons (14 g) light corn syrup or honey
- 3/4 cups (180 g) heavy whipping cream
- 1 teaspoon (4.2 g) vanilla extract
- 1 teaspoon (6 g) salt
FOR THE CARAMEL WHIPPED CREAM
- 1 cup caramel, recipe above
- 2 cups (428 g) heavy whipping cream
- 1/2 cup (75 g) powdered sugar
FOR THE APPLE CIDER CAKE
-
Preheat your oven to 350 degrees F. Spray a 9-inch by 13-inch rectangular pan with non-stick spray. (I used my glass pan). Set aside.
-
In a medium size mixing bowl, whisk together the flour, cinnamon, nutmeg, salt, and baking powder. Set aside.
-
In the bowl of a stand mixer, fitted with the paddle attachment, (or using a hand mixer), beat the sugars and oil on medium-high for two minutes.
-
Add the eggs to the sugar mixture and mix on medium speed for about two minutes. Scrape down the sides and bottom of the bowl and mix again for another 30 seconds.
-
Add the applesauce and vanilla. Stir to combine.
-
With the mixer on low speed, add 1/3 of the flour mixture, followed by half of the apple cider. Continue alternating the flour mixture and the apple cider, finishing with the flour mixture. Mix until no streaks of flour remain. The batter will be thin.
-
Pour the batter into the pan and bake for 35 to 40 minutes. The cake is done when a toothpick inserted in the center of the cake comes out with a few moist crumbs on it.
-
Let the cake cool completely before poking holes on the top. This can be done with a fork, straw, handle of a wooden spoon, or even chopsticks. Whatever you have on hand!
FOR THE APPLE PIE FILLING
-
Peel the apples and then cut them into quarter inch chunks.
-
Combine the apples with the butter, brown sugar, and cinnamon in a medium pot. Slowly bring to a boil over medium heat, using a spoon to gently stir the mixture as it heats up and the apples begin to release liquid. Reduce the heat and simmer the apples gently for 5 to 10 minutes. Be careful not to over cook the apples – you’ll get applesauce.
-
Transfer to a container and put in the fridge to cool down. Once completely cooled, the filling can be stored in the fridge in an airtight container for up to 1 week. I wouldn’t recommend freezing this filling.
FOR THE CARAMEL
-
Heat the cream in the microwave for about a minute. Set aside
-
Combine the sugar, water, and corn syrup in a saucepan over medium heat. Stir until sugar is dissolved and then stop stirring.
-
You want the mixture to cook on its own. Stirring creates crystallization. If you notice sugar crystallizing on the sides of the pan, soak a pastry brush in warm water and run the brush along the sides of the pan where the sugar is building up.
-
Once the mixture turns amber in color, remove the pan from the heat and slowly add the cream, while stirring the caramel.
-
Add the vanilla and salt, and stir to combine.
-
Cool to room temperature before using. The caramel will thicken as it cools.
-
Caramel can be refrigerated for up to two weeks in an airtight container.
FOR THE CARAMEL WHIPPED CREAM
-
Once the caramel has cooled slightly, combine 1 cup of the caramel with the heavy cream. Mix to combine.
-
Cover with plastic wrap and refrigerate overnight in a stainless steel bowl.
-
A cold stainless steel bowl helps the cream to fosrm peaks quickly. Alternatively, you can store the caramel cream in another container and then place a stainless steel bowl in the freezer for about 15 minutes before you whip the cream.
-
When you’re ready to whip the caramel cream, add the powdered sugar and then use an electric mixer to beat the cream mixture into stiff peaks.
-
Best used right away.
ASSEMBLY
-
If you haven’t poked holes in the cake already, do that now with a fork, a straw, or the back of a wooden spoon. I prefer something the size of a straw.
-
Cover the cake with the apple pie filling and at least 1 cup of juices from the filling. If the apple filling is still warm, refrigerate the cake for about an hour before adding the whipped cream.
-
Top with the caramel whipped cream and sprinkle with cinnamon.
-
Serve right away or cover and refrigerate until ready to serve. (I actually like it best next day.)
#Caramel #Apple #Poke #Cake #Fall #Dessert